
Scenario
How to Identify and Store Currently Running Queries in a Table?
To retrieve information about currently executing requests on a Microsoft SQL Server database, we can use several Dynamic Management Views (DMVs) to gather information about the status of the requests, sessions, and connections associated with the database.
- sys.dm_exec_requests : DMV that contains information about currently executing requests in the SQL Server database.
- sys.dm_exec_sessions : DMV that contains information about the sessions connected to the SQL Server database.
- sys.dm_exec_connections : DMV that contains information about the connections established to the SQL Server database.
So with the above three DMVs we can write a query to find the currently running queries in SQL Server with the below-listed information.
- SPID: The ID of the session associated with the request.
- Status: The status of the session.
- Login: The login name associated with the session.
- Host: The hostname associated with the session.
- BlkBy: The ID of the session that is blocking this request, if applicable.
- DBName: The name of the database associated with the request.
- CommandType: The type of command being executed by the request.
- SQLStatement: The text of the SQL statement being executed.
- ObjectName: The name of the object associated with the statement, if applicable.
- ElapsedMS: The total elapsed time for the request.
- CPUTime: The CPU time consumed by the request.
- IOReads: The total number of logical and physical reads performed by the request.
- IOWrites: The total number of writes performed by the request.
- LastWaitType: The last wait type for the request.
- StartTime: The start time of the request.
- Protocol: The network transport protocol used by the connection associated with the request.
- ConnectionWrites: The number of writes performed by the connection.
- ConnectionReads: The number of reads performed by the connection.
- ClientAddress: The client network address associated with the connection.
- Authentication: The authentication scheme used by the connection.
Query to Identify Currently Long Running Queries
SELECT
-- Session information
er.session_id AS SPID,
ses.status AS [Status],
ses.login_name AS [Login],
ses.host_name AS Host,
er.blocking_session_id AS BlkBy,
-- Database information
DB_Name(er.database_id) AS DBName,
-- Execution information
er.command AS CommandType,
st.text AS SQLStatement,
OBJECT_NAME(st.objectid) AS ObjectName,
er.total_elapsed_time AS ElapsedMS,
er.cpu_time AS CPUTime,
er.logical_reads + er.reads AS IOReads,
er.writes AS IOWrites,
er.last_wait_type AS LastWaitType,
-- Connection information
er.start_time AS StartTime,
con.net_transport AS Protocol,
con.num_writes AS ConnectionWrites,
con.num_reads AS ConnectionReads,
con.client_net_address AS ClientAddress,
con.auth_scheme AS Authentication
FROM sys.dm_exec_requests er
OUTER APPLY sys.dm_exec_sql_text(er.sql_handle) st
LEFT JOIN sys.dm_exec_sessions ses ON ses.session_id = er.session_id
LEFT JOIN sys.dm_exec_connections con ON con.session_id = ses.session_id
WHERE er.session_id > 50 AND DB_Name(er.database_id) = 'ABCD' -- Filter by session ID and database name
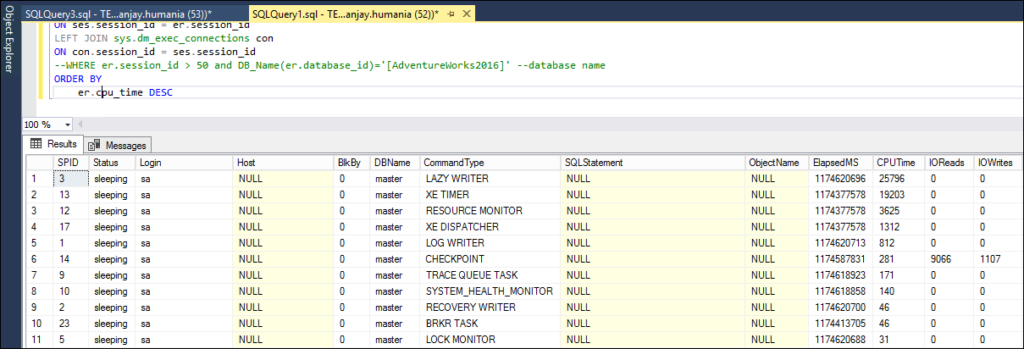
ORDER BY er.cpu_time DESC -- Sort by CPU time in descending order
The query filters the results to show only requests associated with a database named ‘ABCD’ and sessions with an ID greater than 50. The results are sorted by CPU time consumed by each request in descending order.
As per our requirement, we can change the conditions by changing the database name or removing the whole database name condition.
Automating the query to Identify and Store Long Running Queries in a Table
Now to store the output of the above query we will use a table in a database and also run the query by an agent job in intervals of 10 – 15 minutes. Before that, we will convert the above query to a stored procedure.
Creating a stored procedure with the above query to Identify Currently Long Running Queries and in a Table
USE <Database_Name>
GO

Create proc sp_OngoingTransaction
as
begin

insert into OngoingTransaction
(SPID,Status,Login,Host,BlkBy,DBName,CommandType,SQLStatement,ObjectName,ElapsedMS,CPUTime,IOReads,IOWrites,LastWaitType,
StartTime,Protocol,ConnectionWrites,ConnectionReads,ClientAddress,Authentication)

SELECT
    SPID                = er.session_id
    ,Status             = ses.status
    ,[Login]            = ses.login_name
    ,Host               = ses.host_name
    ,BlkBy              = er.blocking_session_id
    ,DBName             = DB_Name(er.database_id)
    ,CommandType        = er.command
    ,SQLStatement       = st.text
    ,ObjectName         = OBJECT_NAME(st.objectid)
    ,ElapsedMS          = er.total_elapsed_time
    ,CPUTime            = er.cpu_time
    ,IOReads            = er.logical_reads + er.reads
    ,IOWrites           = er.writes
    ,LastWaitType       = er.last_wait_type
    ,StartTime          = er.start_time
    ,Protocol           = con.net_transport
    ,ConnectionWrites   = con.num_writes
    ,ConnectionReads    = con.num_reads
    ,ClientAddress      = con.client_net_address
    ,Authentication     = con.auth_scheme
FROM sys.dm_exec_requests er
OUTER APPLY sys.dm_exec_sql_text(er.sql_handle) st
LEFT JOIN sys.dm_exec_sessions ses
ON ses.session_id = er.session_id
LEFT JOIN sys.dm_exec_connections con
ON con.session_id = ses.session_id
WHERE er.session_id > 50 and DB_Name(er.database_id)='ABCD' --database name
ORDER BY
    er.cpu_time DESC
end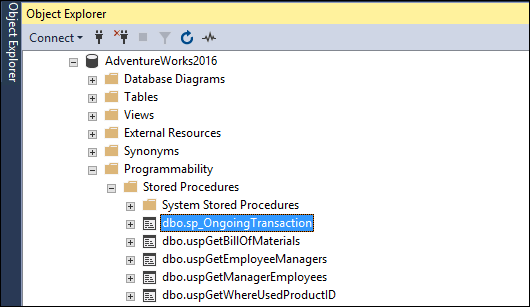
Creating a table to store the data
With the below query, we will create a table in a database to store the output.
USE <Database_Name>
GO

Create Table OngoingTransaction
(
SPID   int,
Status varchar(100)  ,
Login   varchar(100) ,
Host     varchar(100) ,
BlkBy       varchar(100) ,
DBName     varchar(100) ,
CommandType     varchar(100) ,
SQLStatement    varchar(max) ,
ObjectName      varchar(100) ,
ElapsedMS     numeric(18) ,
CPUTime      numeric(18)    ,
IOReads         numeric(18) ,
IOWrites        numeric(18) ,
LastWaitType     varchar(100) ,
StartTime       datetime,
Protocol         varchar(100) ,
ConnectionWrites numeric(18) ,
ConnectionReads numeric(18) ,
ClientAddress   varchar(100) ,
Authentication  varchar(100),
ExecutedOn datetime DEFAULT GETDATE()
)
Now if we execute the stored procedure, it will push the output data of the query to the table.
exec sp_OngoingTransactionNow to check the table we may run a select statement on the table.
select * from OngoingTransactionCreating a job to automate the process
Here’s a step-by-step guide to creating a job in SQL Server:
- Open SQL Server Management Studio (SSMS) and connect to your SQL Server instance.
- Expand the “SQL Server Agent” node in the Object Explorer.
- Right-click the “Jobs” folder and select “New Job…” from the context menu.
- In the “New Job” dialog box, provide a name for the job in the “Name” field.
- In the “Steps” section, click the “New” button to create a new job step.
- In the “New Job Step” dialog box, provide a name for the step in the “Step name” field.
- In the “Type” field, select the type of job step you want to create (e.g., Transact-SQL script, Operating system (CmdExec), etc.).
- In the “Command” field, enter the command you want to run for the job step (e.g., the path to an executable file, a Transact-SQL script, etc.).
- In the “Advanced” section, you can configure additional options such as the database context, the output file, and the error file.
- Click “OK” to close the “New Job Step” dialog box.
- In the “Job Steps” section, you can add additional steps as needed.
- In the “Schedules” section, you can configure the schedule for the job. To create a new schedule, click the “New” button.
- In the “New Job Schedule” dialog box, provide a name for the schedule in the “Name” field.
- In the “Frequency” section, select the frequency for the schedule (e.g., one-time, daily, weekly, etc.).
- In the “Start” and “End” fields, set the start and end dates and times for the schedule.
- Click “OK” to close the “New Job Schedule” dialog box.
- In the “Notifications” section, you can configure notifications to be sent when the job starts, succeeds or fails.
- In the “Target servers” section, you can select the SQL Server instances where the job should be run.
- Click “OK” to create the job.
Once you have created the job, you can start it manually or wait for it to start automatically based on the schedule you have configured. You can also monitor the status of the job, modify its properties, or delete it as needed.